Transfer Movies to iPad Air/mini, new iPad, iPad 2

2012-07-24 15:15:16/ Posted by Sand Dra to Portable Device
Follow @Sandwebeditor
 iPad is a popular tablet device. Owning an iPad, you can watch your favorite movies on its wide screen wherever you are, whenever you want. For the new users of iPad, the problem of how to transfer movies to iPad is a little difficult. In fact, to transfer video to iPad, one thing you need to know is that iPad has its own supported video formats. So, not all videos can be directly watched on iPad.
Therefore, to transfer movies to iPad, you have to convert your videos, downloaded or bought, to iPad compatible video format, if your videos are not iPad recognized format. After doing video conversion, you can use iTunes to sync the converted videos to iPad.
In the following guides, I will show you how to transfer movies to iPad in details. Of course, you need a video converter, here we have a freeware recommending to you. iStonsoft iPad Video Converter Free, can convert almost all popular video formats to iPad compatible. Batch conversion brings the high efficiency. Drag&drop operation simplifies the steps. Only 3 steps, you can finish the format conversion: Import > Output settings, Start conversion.
I will show you how to transfer movies to iPad with 2 Parts:
Part1: Convert Videos to iPad Air, iPad mini and so on
STEP0: Free download, install and launch
![]()
STEP1: Import your movies
The software provide 3 approaches for loading your movies:
1) From the toolbar, click "Add" button to load your movies;
2) Open your folder which contain the movies, select one or more, then directly drag and drop your movies to the software interface;
3) From the menu, click File > Add to browse and find movies which you want to import, then load them to the software.
Once video files loaded, you can see them appear in the file list, including the Source, Trimmed Length, Estimated Size, Destination File, Profile, etc. You can also preview them in the Preview Thumbnail window. Furthermore, other tools on the toolbar like Remove, Up, Down, can help you to delete, move up, or move down the imported video files.
STEP2: Output settings
Output format: Click the drop-down arrow of Profile, then choose your desired output video format for iPad. The default is saving video files as MP4 format, which is an optimized video format for iPad. So you don't have to to change the default output format if you don't have especial or extra needs.
Output folder: The default destination folder is saving output files to the iStonsoft installation folder. You can customize the output directory folder by clicking Browse button.
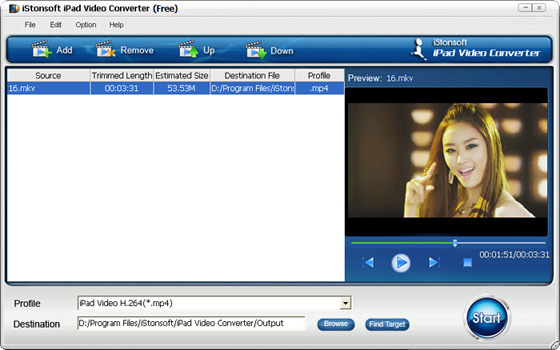
STEP3. Begin conversion
After making all necessary settings, simply click Start button to activate the conversion.
Part2: Transfer video to iPad with iTunes
After converting videos to iPad, you need to use iTunes to sync the converted files to iPad. Just plug your iPad to computer with USB cable, then import the converted video file(s) to iTunes program, then sync the imported video files to iPad for watching.
Bingo! You've made it! Just several mouse clicks, you can transfer movies to iPad with ease! With this excellent software, an easy access to a simple yet convenient digital entertainment life is no more a dream! So don't wait any more, go ahead to free download and have a try by yourself!
![]()
Related Links:
How to Convert FLV to iPad
Read Google Books on iPad