How to Recover Data from iTunes on Mac?

2012-9-18 14:23:20 /
Posted by Neville Bergle to PC Utility Topics
Follow @ Nevilleeditor
Have you stored many things in iTunes, such as music, photos, videos, TV shows, podcasts etc., but unfortunately, your systems has crashed and you lost everything in your iTunes. This is a big case because some apps and TV shows etc. are purchased from iTunes App Store, and you are not willing to buy them again. What will you do?
Actually, the files are not lost, and you can find them using data recovering software. For Mac users, there is a nice tool called iPad/iPod/iPhone Data Recovery for Mac, which can help you recover data from iTunes on Mac, such as iPhone contacts, photos, SMS, iPod music, videos etc., and you will never need to worry about losing anything in your iTunes once you have iTunes Data Recovery in hand.
As being the most professional and easy-to-use Data Recovery for iTunes, it is a must-have program for Apple fans, Then in this guide we will teach you how does it work exactly and you may free download it to follow us step by step.


Note: For Windows users, please download the iPad/iPod/iPhone Data Recovery for recovering data from iTunes.
Steps: How to Recover iTunes Data on Mac?
Step 1. Download and install iTunes Data Recovery on Mac
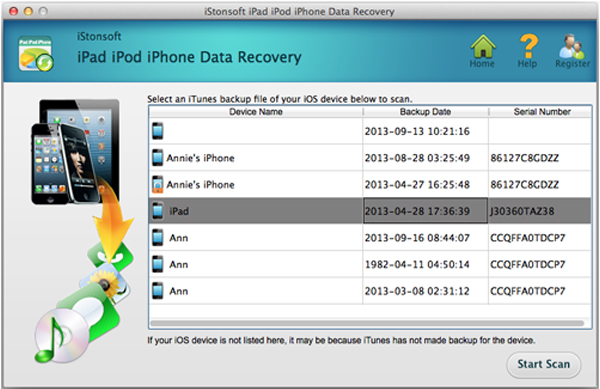
After that, click on “Start Scan” button on the main interface. By doing this, it will show you a whole list of devices that are synced with your Mac’s current copy of iTunes. Highlight a device and click Scan.
Step 2. Choose the files you want to export
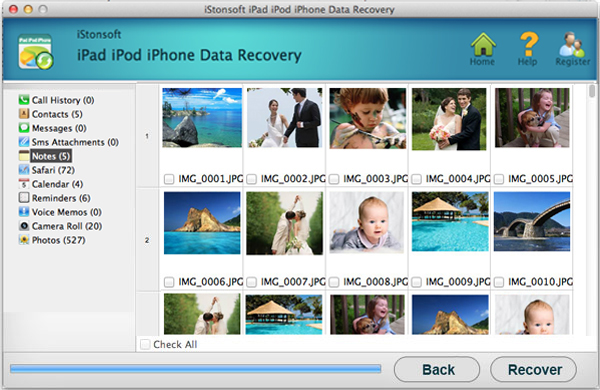
Then you will be able to see the thumbnails on the right window of all media files synced to iTunes previously of the selected device. On the left, there are categories from Photos & Videos, Contacts, Messages, Call History and Notes. Click one and you will see the relevant files on the right.
Step 3. Start recovering data from iTunes on Mac
Once you’ve done with the selecting, click on “Recover” button on the top tool bar. In the new pop-up windows, name a destination folder and the files will be exported immediately. All done.
What's the Next?
After finishing recovering data from iTunes on Mac, your file will be exported immediately to the location you specified before. Now you’re all done. Simple, right? To scan, view and recover files from another device, just click the Back button. Enjoy your reclaimed photos, videos, and more!
Related Links:
How to Recover Data from Hard Drive on Mac